Automated Start Sequences and other useful Gear
Provided by the SCSC Principal Race Officer, Patrick.
I am not selling anything. I offer these ideas and plans as a benefit to the sailing community.
Future projects: Weather Station
Provided by the SCSC Principal Race Officer, Patrick.
I am not selling anything. I offer these ideas and plans as a benefit to the sailing community.
Future projects: Weather Station
In 2024, I swapped out the lights for automated flags. Lights were awesome, but lacked… lets say “tradition”. Inspiration struck me one day, and pneumatics (air cylinders) have worked solidly for one full season (6 months, 50+races).
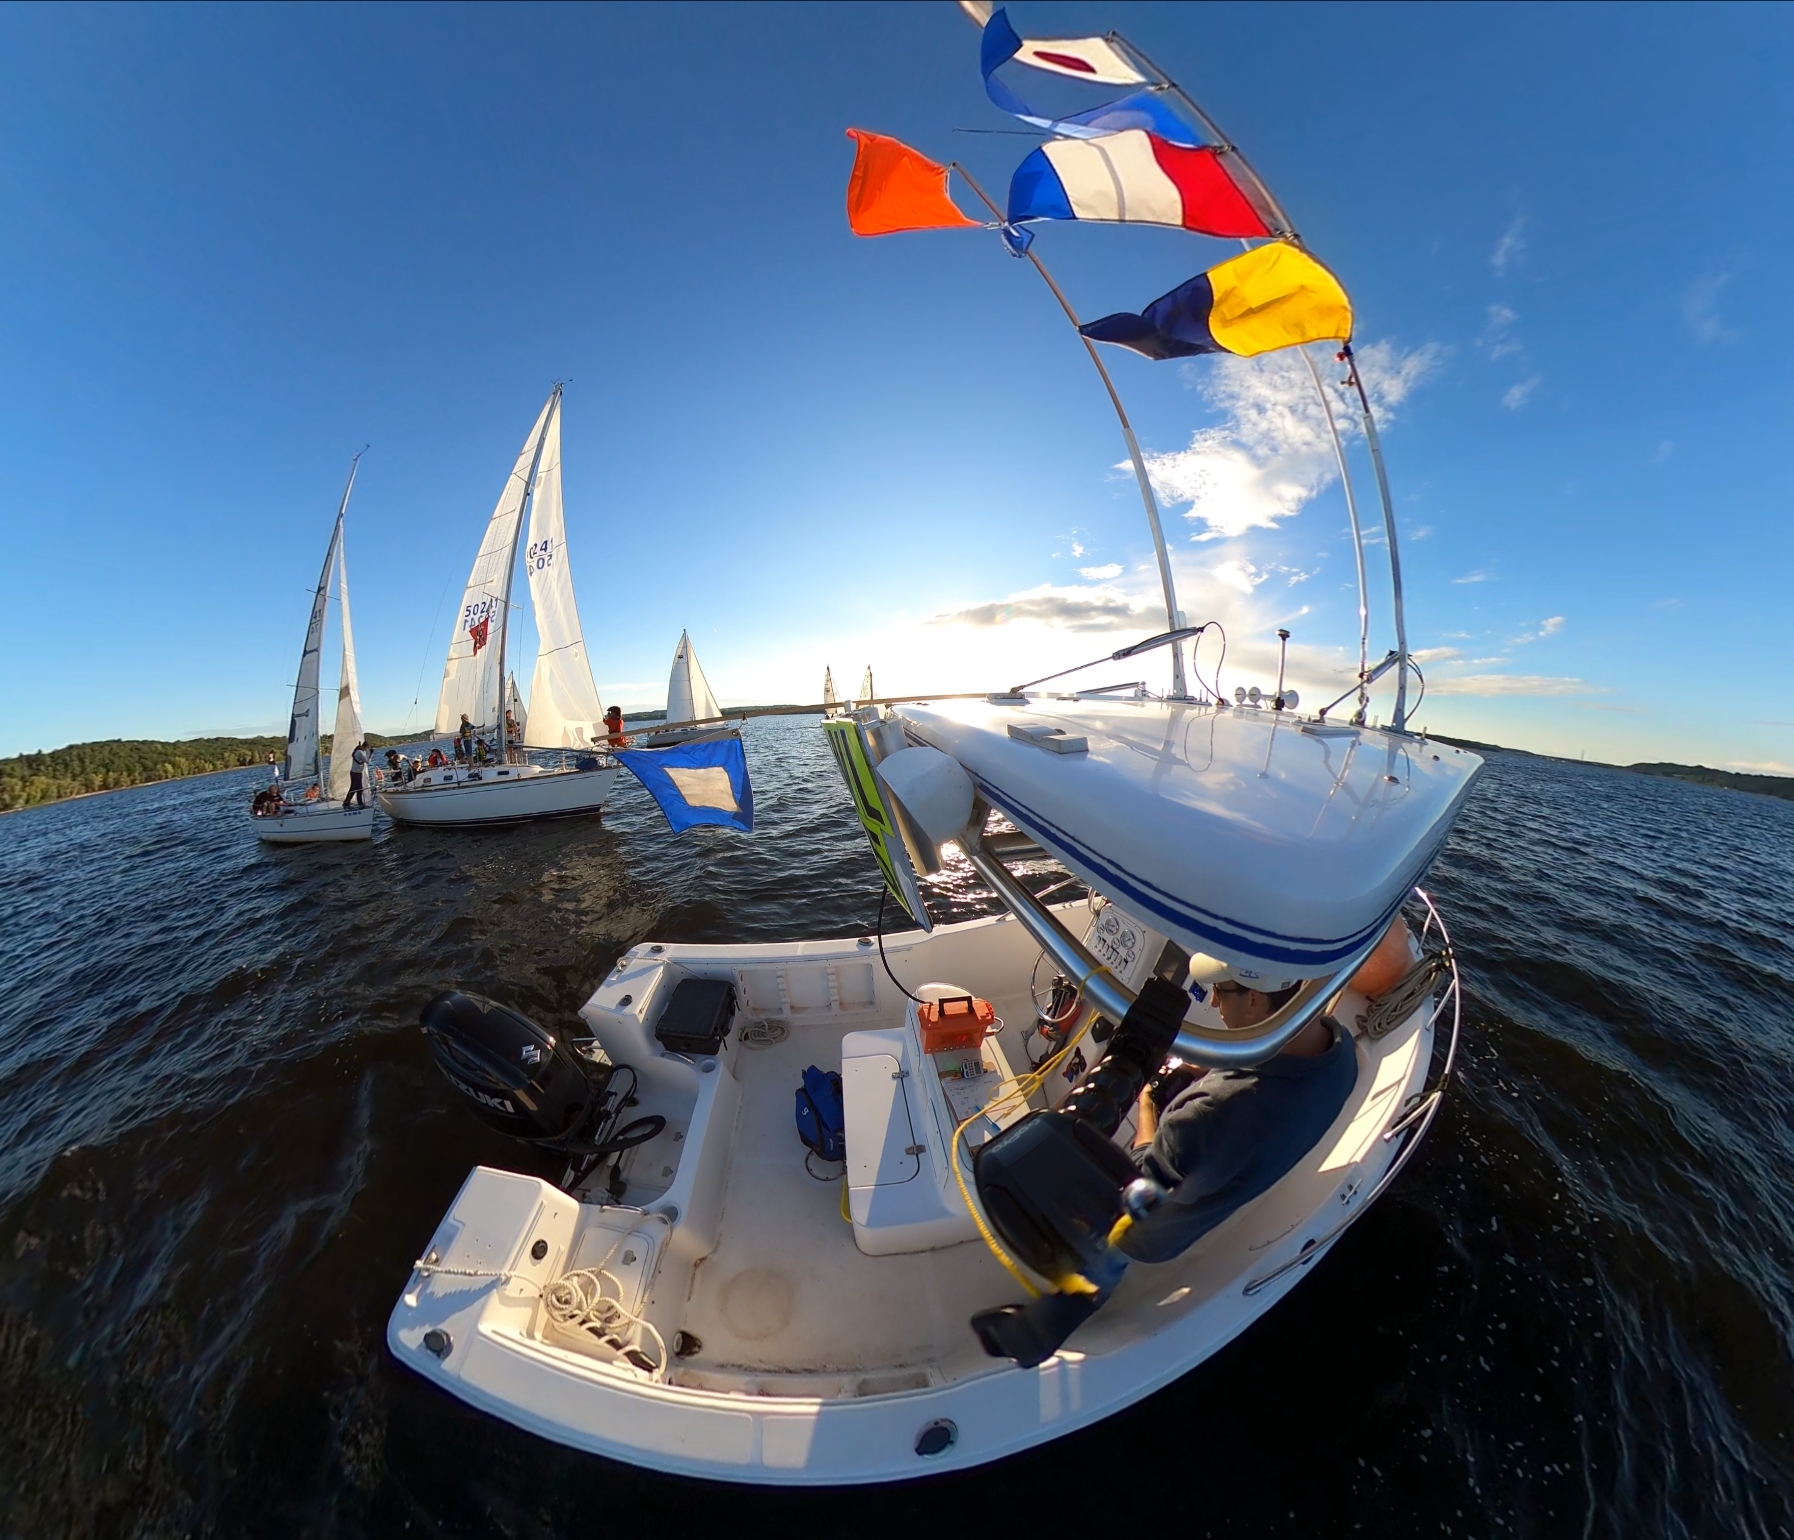
1 Minute to Start

Flags on display while Med-Moored at a public event.
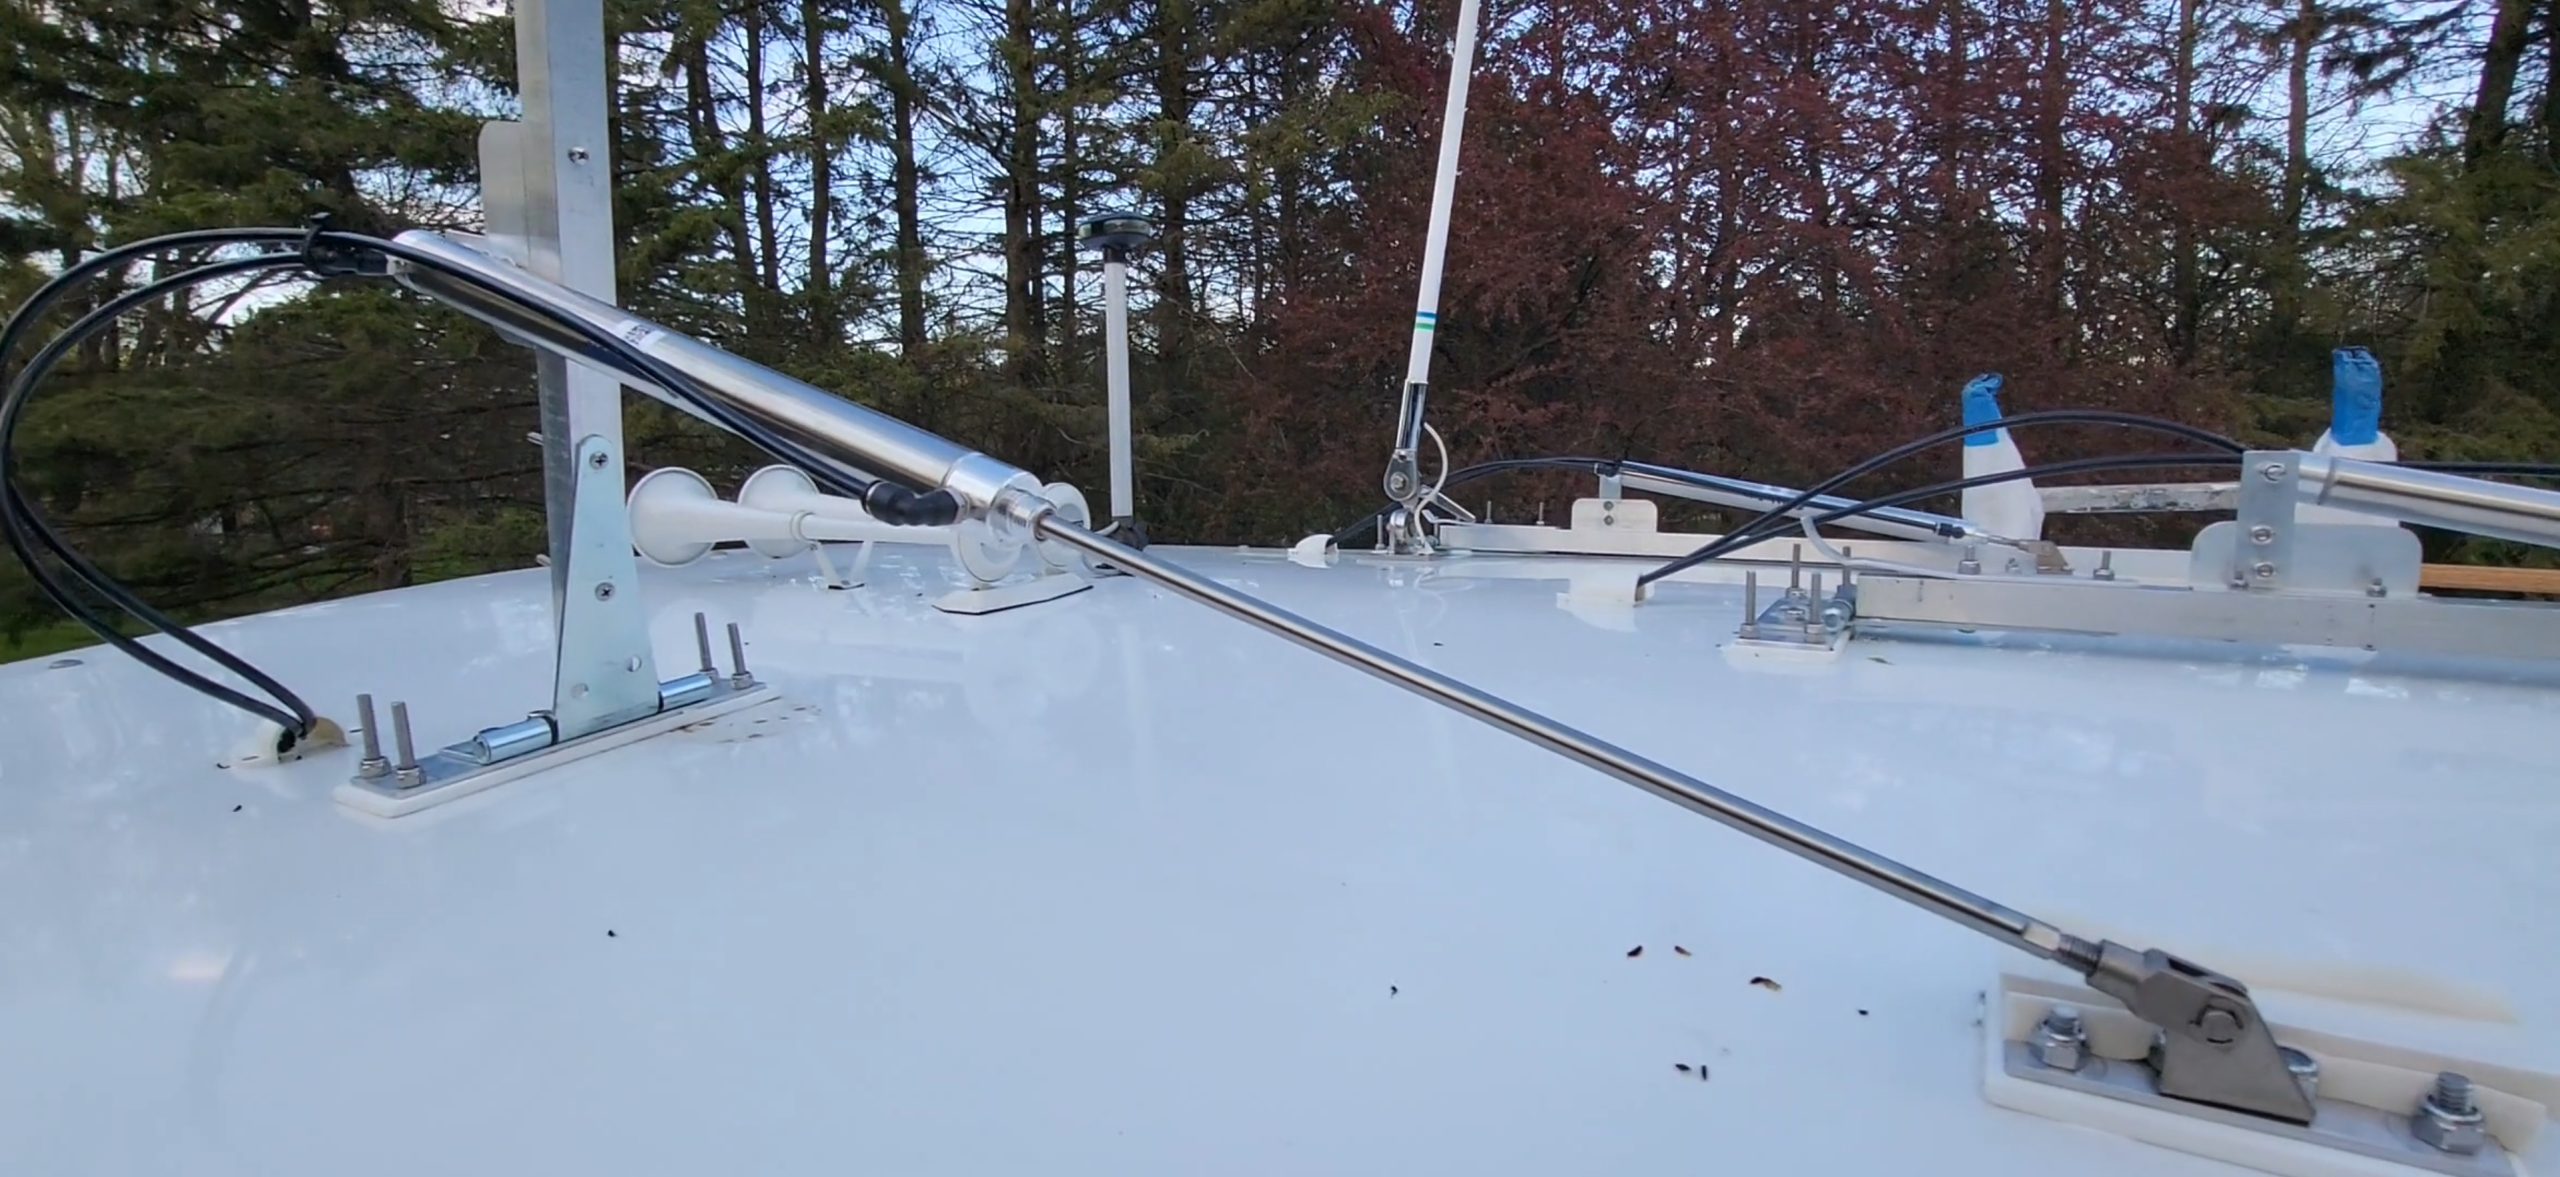
Flagpole Air Cylinder Mounts
Testing was done over the entire 2024 sailing season. (in fresh water, in Minnesota) Appx 50 races, well over 100 sequences. Several races had winds above 25mph. A couple times, I forgot the flags were up and powered the boat up to 40mph. Aside from an occasional loose nut, and learning to shorten air line lengths, there weren’t any issues – mounting was rock solid.
All mechanicals are stainless. Electronics are kept as sealed as possible in an electronics box under the T-Top.
Throughout the year, I noticed there was a delay between flag actuation signals and response from the cylinders. This was remediated by moving the solenoids closer to the cylinders: shorter air lines. I kept the solenoids under the hard top for rain protection, and the cylinder connection lines were reduced to a max of 2′ in length.
Tell your sailors to time from the start of flag movement (Up AND Down). The cylinders may not raise or lower the flags as fast as a dedicated human can, but they are taller and are perfectly consistent every time.
I’m certain there are better ways to engineer the flag hinges and geometry! Would love to hear your ideas. Contact form below.
360 Videos: Use mouse to look around. +/- to zoom in/out. Increase resolution for better detail.
Looks stunning with VR Goggles.
This video is a very windy day (20-25 mph). Long-distance race, hence the low-energy start from competitors.
Another start sequence with more typical winds – appx 10mph.
| Part | Description | Link | Price (appx) |
| Cylinder (3 of these) | 1-1/16″ Bore Double-Acting Universal Mount Cylinder. 12″ Stroke. With: Rod Clevis, Clevis Mounting Bracket, Male Swivel Elbows |
Frightprops | $90/ea |
| Valves (3 of these) | 4-Way 5-Port Valve with 1/8″ ports With: Voltage 12v (or as you require), 2x Speed Control Mufflers, Optional Male Fittings (3×1/8″ threads – 1/4″ tubing), Screws as needed for your mounts (I didn’t need them) |
Frightprops | $45/ea |
| Manifold | Aluminum Block Manifold with fittings for 1/4″ air line – 4 Ports There’s a cheaper plastic version available as well. |
Frightprops | $37.00 |
| Stopper Plug | Plug for Push-On Fittings (to plug unneeded holes in the manifold). One required, but a few are helpful during testing. | Frightprops | $1/ea |
| Air Line | Polyurethane Airline. 1/4″ I used 70ft during prototyping and installation, but 50ft is probably fine. |
Frightprops | $40 |
| Quick Connect | Connector for air compressor to 1/4″ air line | Frightprops | $6 |
| Milwaukee Air Compressor | M18 Fuel 18-Volt Air Compressor 2840-20 You can find deals on these – shop around. |
Milwaukeetool | |
| Milwaukee Battery (2 of these) |
M18 High Output XC8.0 Battery You can find deals on these – shop around. Or, get larger ones – I recommend 8.0 minimum. |
Milwaukeetool | |
| Manual Flag Switches | Rocker Toggle Switch Panel | Amazon | |
| …This is where things really become application-specific… | |||
| T-Hinges (3 of these) | Mine were zinc-plated (non-marine environment = ok-ish), but stainless would be better. Flat side was 4-1/2″, Long side 5-1/2″ Bigger the better. Gate hinges – find them at your local hardware store. |
Fleet Farm | |
| Flag pole holders (3 of these) | 1″ x 36″ square aluminum tube – base for inserting flagpoles | Menards | |
| Flat Bar | 1/8″ x 2″ flat aluminum bar stock – baseplates for mounting flags over hard T-Top. Soft tops may require a different solution. | ||
| StarBoard | 1/8″ thick – perhaps 2 sq ft. Used as standoff for AL baseplates so metal doesn’t hit hardtop. Soft tops may require a different solution. |
||
| Aluminum Angle | 2″ aluminum angle to offset cylinder mount. (cylinder needs to be raised so it doesn’t bind up) | ||
| Flat Bar | 1/8″ x 1″ flat aluminum bar stock – to increase cylinder mount offset as needed. (to further raise the cylinder) | ||
| Stainless Bolts & Nuts | Lots of short ones (1/2″ or less) and longer ones (1-1/2″) to connect aluminum pieces together. Nuts should all be nylon locking type, and even then – check them throughout the year for tightness. Locktite is probably a good idea as well. |
||
| Stainless U-Bolt | As needed to secure flags to T-Top superstructure. I used 12. Size to the tubes in your T-Top. Replace nuts with nylon lock type. | Menards | |
| Cushioning | Foam weather striping (or other foam product) to cushion flag drops. I used some adhesive-backed 1″W x 1/2″T. Doubled it up in places. Will need to replace every year as it compresses over time. | ||
| Clamshell Vents | For air lines through hard top. | Amazon | $9.00 |
| Caulking | Life Seal – To fill all the holes in the T-Top. | ||
| Flagpoles (3 Required) | 1/2″ x 3/4″ x 8′ Oak Parting Bead. Works great as flagpoles. Fits into 1″ square tube tightly. Sand edges to avoid splinters, then varnish, paint, or leave natural. |
Menards | |
| Tension Springs | To compress flagpoles against holders and keep them secure, yet easily removable. I needed them for flagpoles shown above because one side was only 1/2″ wide. | Amazon | $8.00 |
The purpose of the R/C Start Timer is to simplify the duties of the Race Committee. It accomplishes this by automating horns, displaying current sequence time, and by replacing the time-sensitive flag signals with automated lights.
This timer has been born from a proposal we made to the US Sailing organization for a lighted start sequence. That proposal can be seen in other posts on this page, as well as in the Sequences appendix of this user’s manual.
The latest version of the Start Timer is complete as of 2020. It has been used for two seasons with our club, the local sailing school, and at a club on Lake St. Clair.
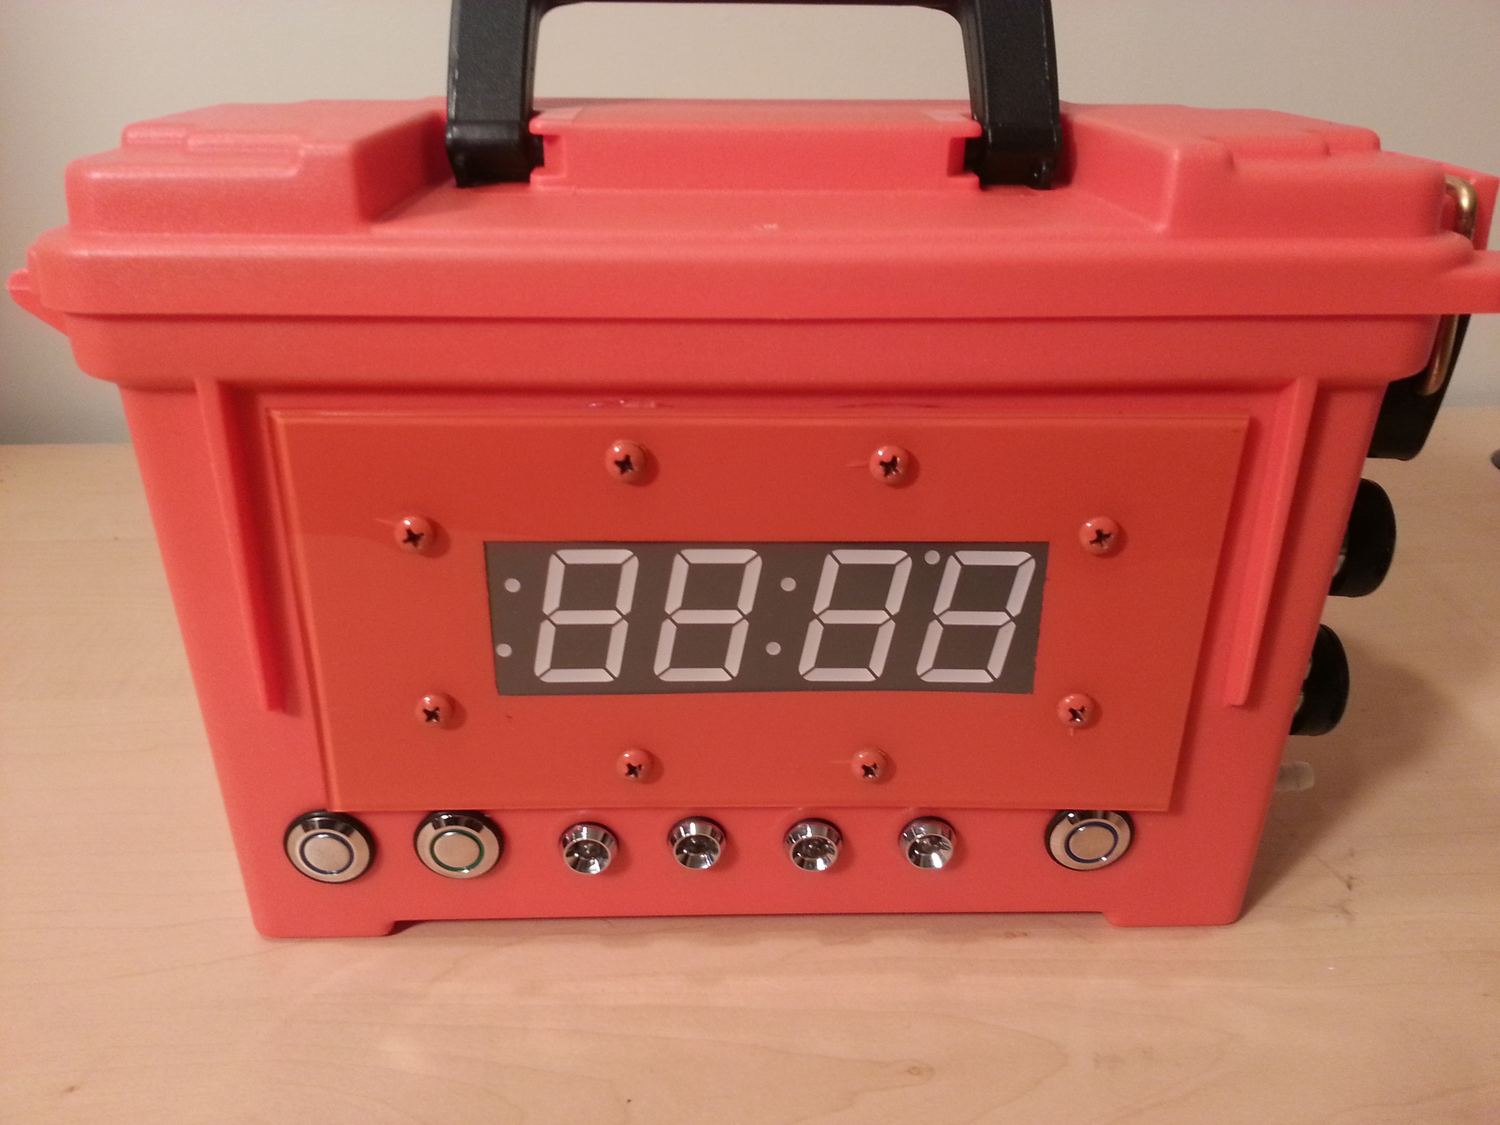
The unit comes with its own battery, air compressor, buzzer, and digital display inside of a water-resistant box.
The horns are made by Wolo and are easily audible in all directions for 2+ miles. It’s a good idea to mount them away from R/C personnel. They can be muffled if necessary.

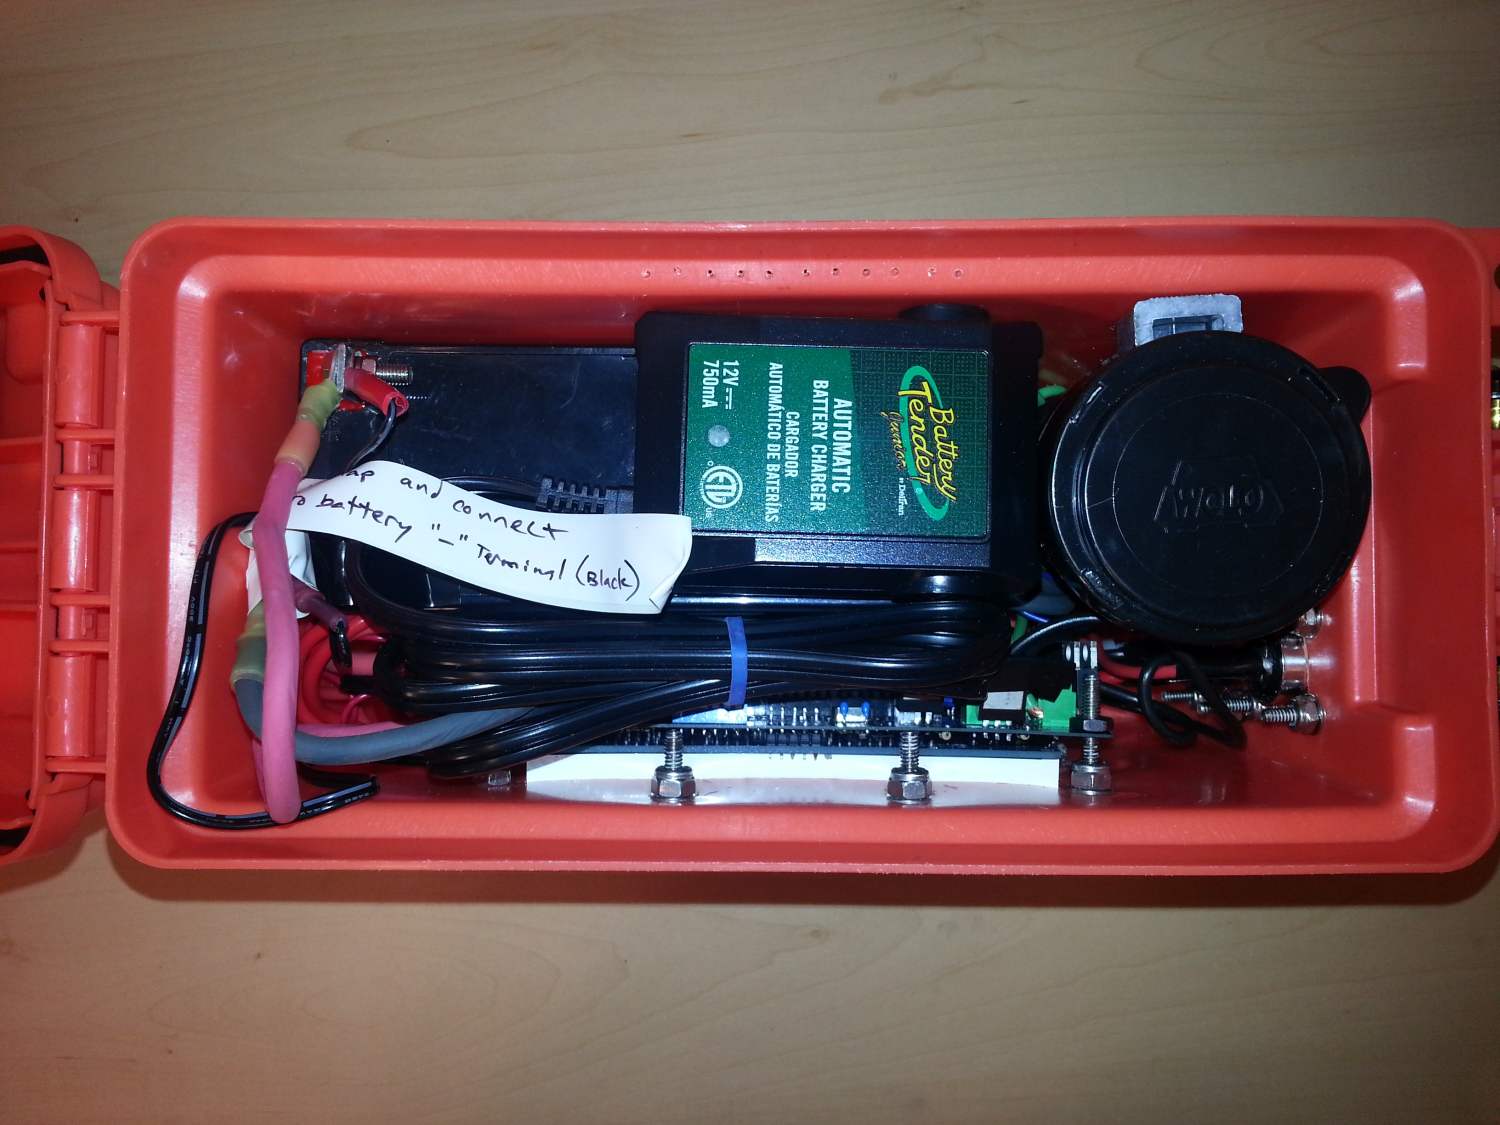
The battery is a 12v 9Ah AGM and depending on use, rarely needs charging. Charger is built in. The timer has a low battery indicator which starts blinking when you’re down to around 5-10 sequences of battery life left. I typically charge it once mid-season (after 2-3 months of use, or around 50 sequences using both horns and lights).
The display uses large 1.2″ digits and can be seen from a distance. It can wash out in bright light, so position the display to not face the sun. The 4-LED’s below the screen can be seen in all lighting conditions – they and the buzzer make the screen redundant within 30 seconds of signals. After all – you should be watching the line, and not the timer!
Everything is water resistant. It can take heavy downpours! The only caveat is that it contains an air compressor – there are tiny air holes on the back side. Do not lay it face up in standing water or some water may be sucked in when the horns operate. Even if that happens, it should continue to run just fine. Simply remember to dry it out when you get back to shore. Note that this unit has been tested in fresh water only – your experience may vary in saltwater conditions.
This unit runs on an ATMega1284p processor (big brother to Arduino devices) on a custom printed circuit board.
The following sequences are supported, but the software can easily be updated to support ANY sequence you can think of:
Choosing which sequence to run is done in the menus (see the users guide for details).
Adding new sequences is done in the firmware. Such updates are emailed or posted online in the form of a small Hex file. Copy that file onto a MicroSD card (card is included, usb card reader is not), power the unit on, and your sequence or other software updates will be installed automatically.

(optional, but highly recommended)
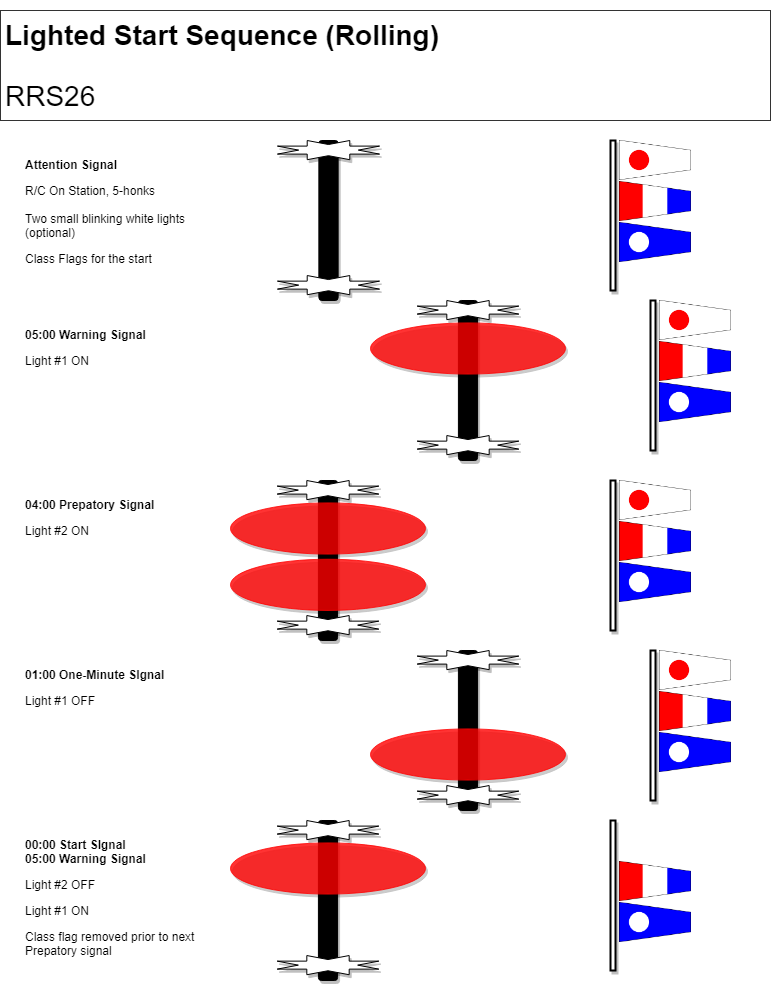
This innovative concept replaces the two start sequence flags (Preparatory and Class Flag) with two sets of lights mounted vertically. Sailors simply look for the lights instead of flags: one light = one flag. Two lights = two flags. See the diagram and Sequences document for more details.
Currently, the lights are made up of super-bright leds from semi-trailer break lights. They are visible in bright sunlight from any direction at up to a mile or more. In overcast or dusk conditions, they can be seen for many miles (I may add a dimming feature for night use, if requested). They are visible in ALL conditions and have seen several years of use in hundreds of events – our sailors have found them to be easy to see, highly accurate, and the transition away from flags was easy for everyone to understand (from novice sailors to highly experienced sailors).
The benefit of lights are that they remove the “human factor” from the start sequence. Volunteer race committees often have variability in how they raise flags. +/- one second or more, is quite common. When do sailors start timing – when the flag starts to go up, or when it’s fully up? Some clubs use poles, some use pulleys, some clubs do things…other ways… In my 30+ years of running sailboat races, I have seen quite a variety of ways to raise flags, and as much variety in the reliability of timing from those signals. Why go through the hassle of recruiting/paying someone simply to raise flags when that position can be automated? Spare your crew for more important things, such as watching the line for over-earlies!
The device is very well built, and the circuits and software are highly refined, but assembly of components is very much a home-built product.
I was planning on making these, but time and supply-chain issues have put that on hold. I may be able to help others build their own if they have some electronics or software experience. Eventually, I may make this an open-source project.
More information can be found in the Users Manual and Sequence documents.
RCST Users Manual
RCST AppxA(Sequences)
Reach out us on the contact form below if you have any questions!
Do you have any constructive feedback about this project? Would you like to learn more or stay in the loop? Feel free to send our development group a message:
This is a proposal for Lighted Sequences. It supports both Rolling and Non-Rolling varieties. For simplicity, it only documents RRS26, but can be applied to other sequences quite easily.
The initial concept was to simply replace two flags (Class # and “P”) with lights. Turns out, its more complicated than that. Read our provisional proposal here (it is regularly updated): Lighted Start Sequence (Google Docs)
If you have any suggestions for improvement, please let us know!
| Minutes before starting signal | Flag Signal | Light Signal | Sound Signal | Means |
| (any) | Class Flags, sequentially ordered. *
P, I, Z, Z with I, U, or black flag |
Defines class order and penalties | ||
| 5 | Top Light On | One | Warning Signal | |
| 4 | Bottom Light On | One | Preparatory Signal | |
| 1 | Top Light Off | One Long | One-Minute | |
| 0 | Class flag removed * | Bottom Light Off | One | Starting Signal |
* Class and penalty flags for started classes shall be removed prior to the Preparatory signal for subsequent classes.
The warning signal for each succeeding class shall be made with or after the starting signal of the preceding class.
A competing boat would see something like the following image. Light colors are to be decided.

All of these lights mean something in the USCG rules, so we added blinking lights – that way our Race Committee shouldn’t be confused with another type of vessel.
There are significant hardware changes for this version of the timer. Including an upgrade of the processor to the ATMega1284p, the addition of an SD Card, and support for multiple sequence lights.
Here are a few examples of circuit-board related updates.
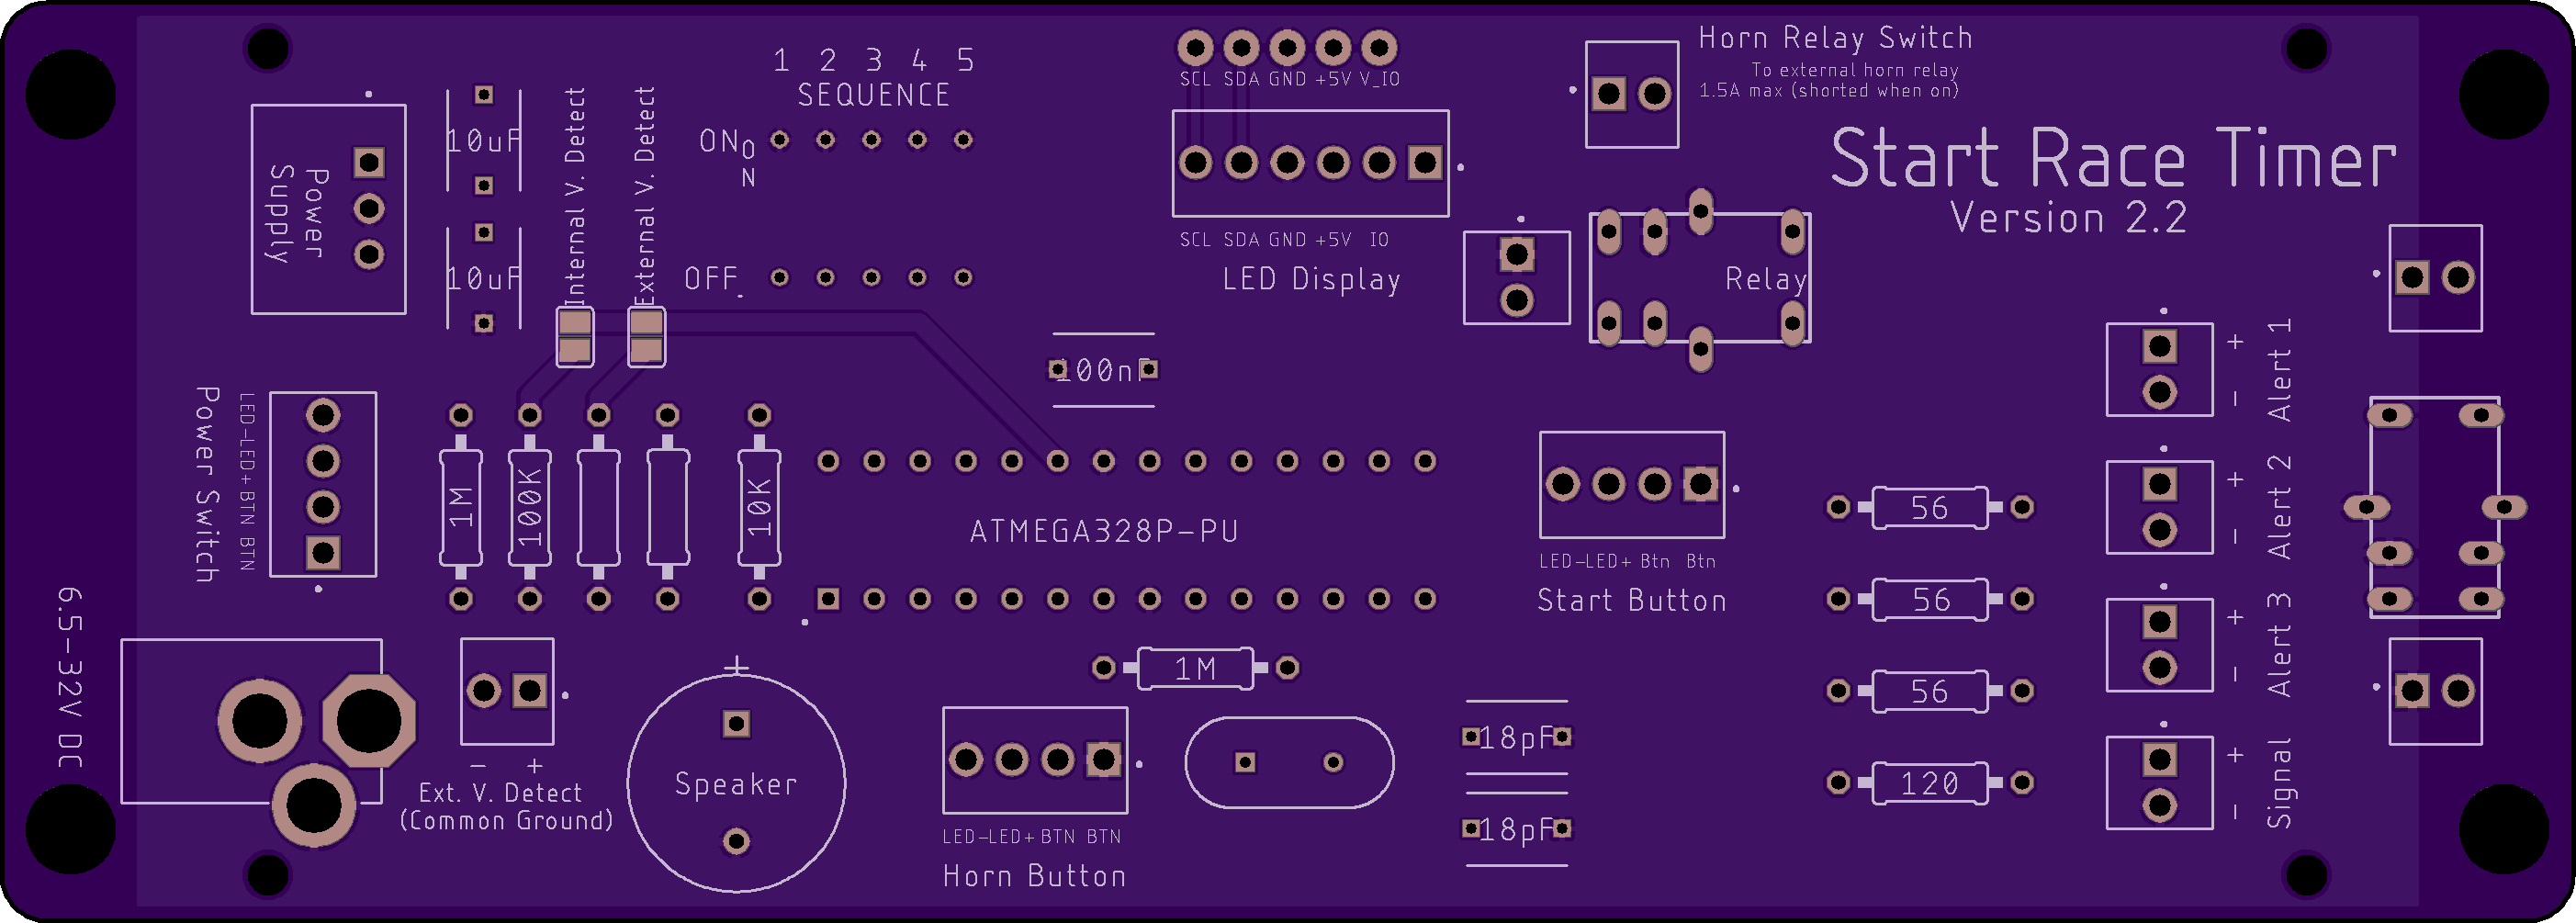
PCB (TOP) From version 2.2 (V4 forthcoming)
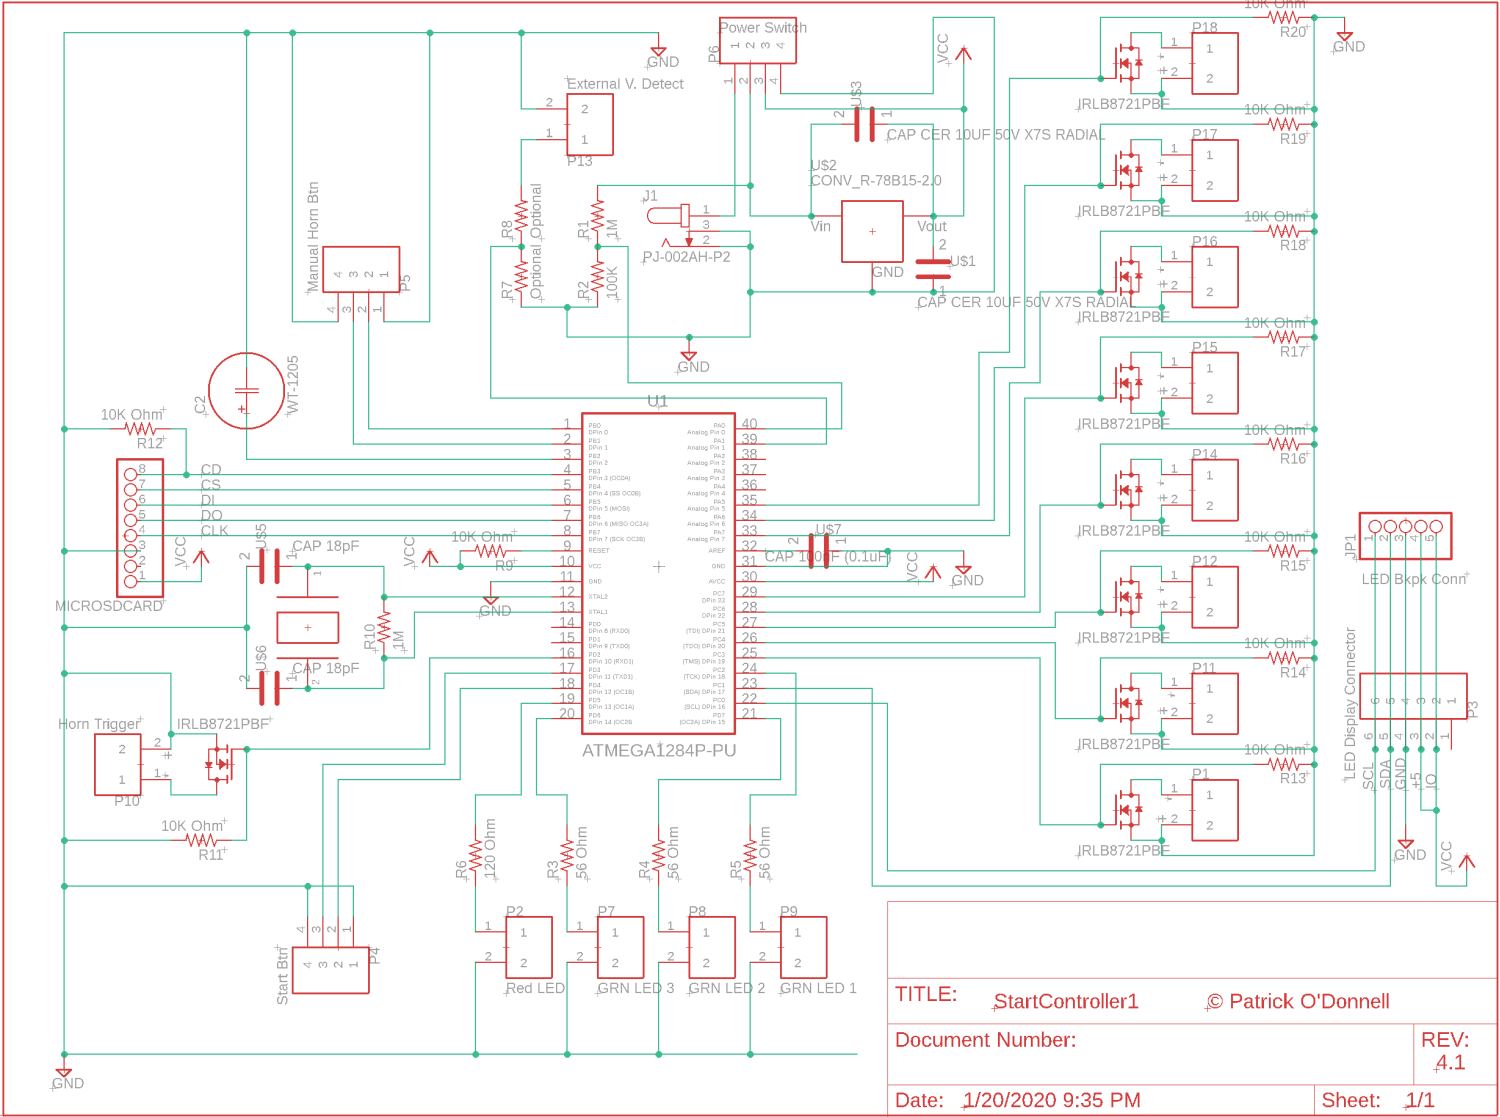
Circuit board schematic to date. Work in progress…
The software is undergoing a complete redesign. We anticipate support of an unlimited number of customizations, including not only sequences, but changes to the lighting patterns and number of lights. As with all new concepts, we expect to adjust the lights as we gain experience with them.
One key element to this is the addition of a Micro SD Card reader. This will permit patches and upgrades to be sent out to customers via email. Copy the file onto the card, put it in the timer, power it up, and presto: you have an upgraded start timer. Support for user-customized sequences may also be possible.

V4 Class Diagram
A menu system will be used for configuring the sequences and rolling details.
Our club uses a custom start timer to run the start sequences. It assists the Race Committee to time the sequences and honk the horns accurately. Like many clubs, we are short on volunteers, and automating simple procedures benefits everyone in the club. The start timer has undergone a few iterations of improvements since its introduction, but the greatest change is proposed for the summer of 2020 – to add lights instead of using traditional flags.
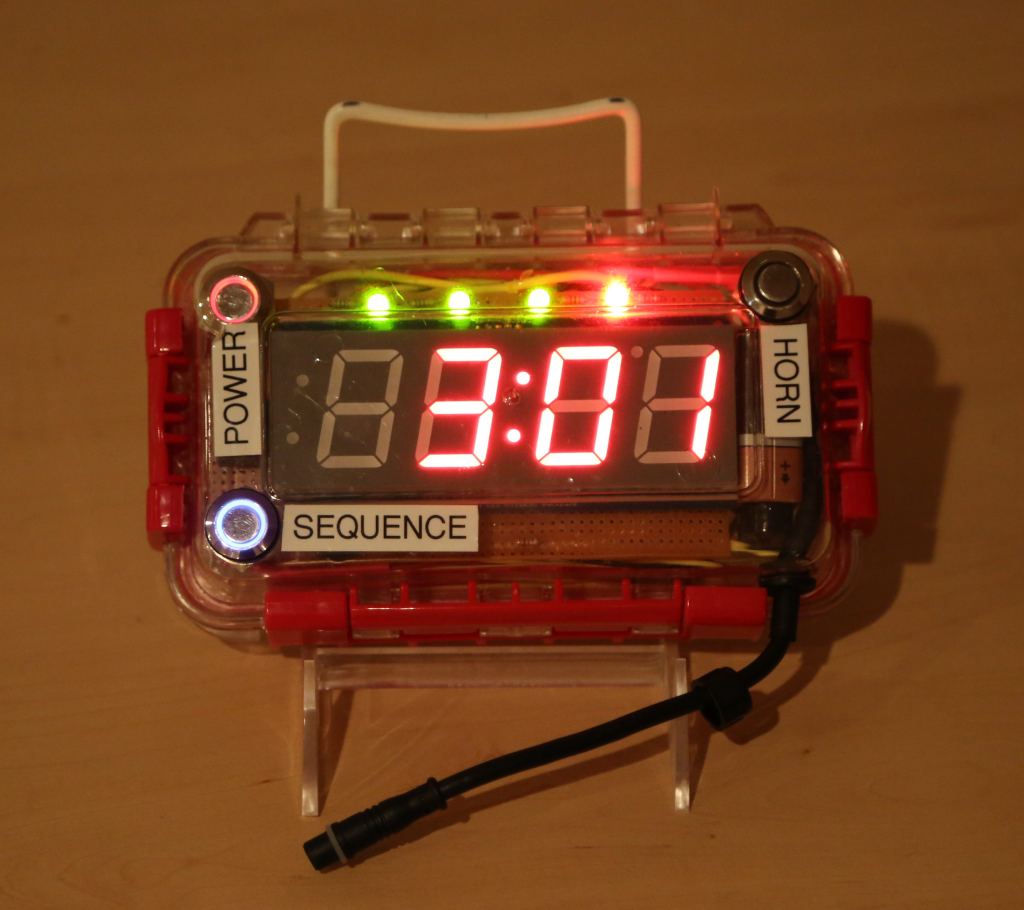
First version, with one second to go before Prep Flag Up.
The first version was created around 2013-14. It featured a handheld box based upon an Arduino Uno. Self powered, but relied upon horns mounted to the boat and running from the boat battery. It was completely waterproof, held many different sequences, and the original is still in use today.
It featured a 2″ tall display, count down timer, automatic horn relay, and supported many sequences. An onboard switch allowed any two sequences to be run at a time, with additional sequences available by flashing the memory. A series of led’s and a speaker alerted the Race Committee to upcoming flag changes. Run time on a 9-volt battery was around 1 month (20-30 sequences).
The interface is easy to use with a buttons for power, sequence, and a manual horn. Four LED’s indicate seconds to a flag change (30, 20, 10, 5-1). A speaker announces each of these time increments so the R/C personnel don’t need to maintain visual eye contact on the timer.
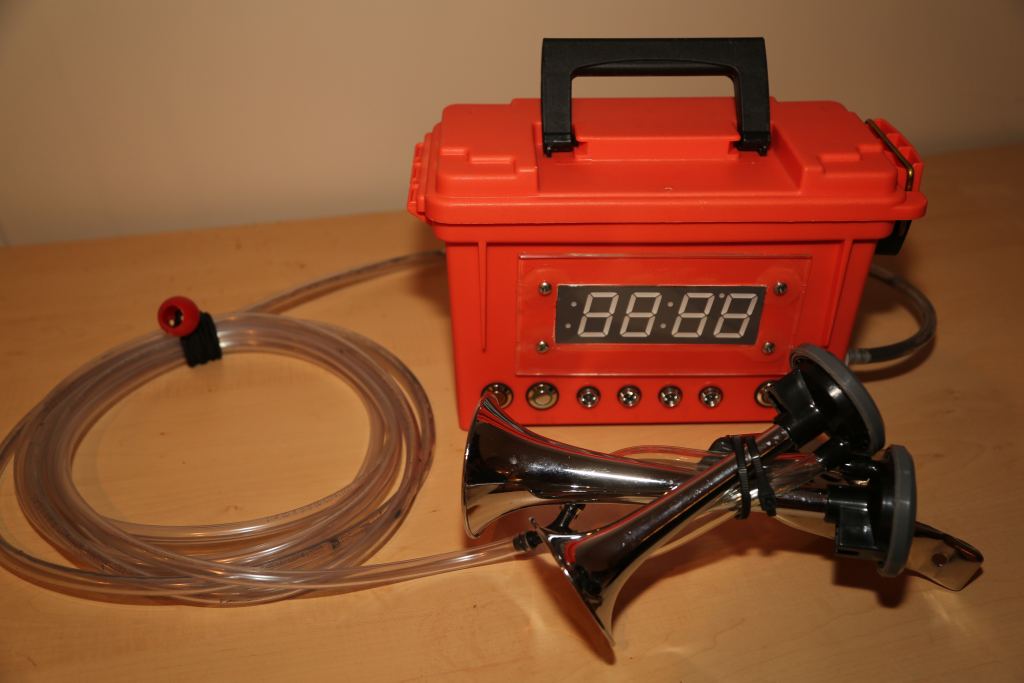
Version 2, complete with horns.
Version 2 was developed in the fall of 2018. It moved away from the Uno and was built around the ATMega1284p microprocessor and a custom printed circuit board. A larger battery was fitted so that an on-board horn system could be added.
Our local sailing school uses it near downtown Hudson – the horns are so loud that it can be heard inside buildings while shopping!
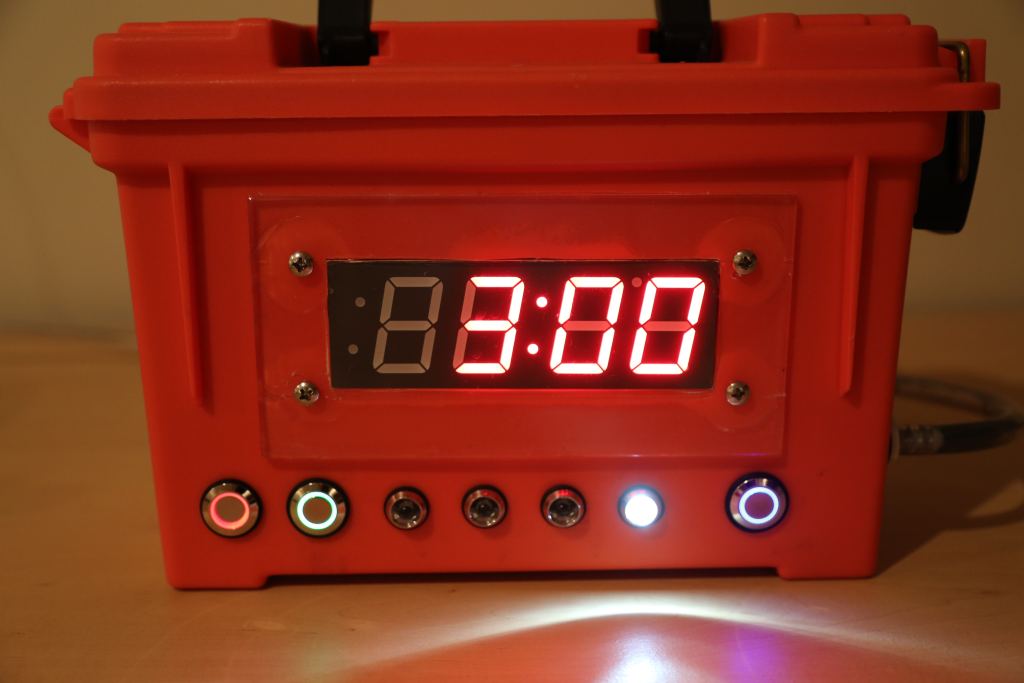
At 3 minutes. Horn is sounding and an alert light is shown.
This version included all the features of Version 1, as well as a 9Ah battery, air compressor, and 8 ft of tubing to remotely place the air horns. The printed circuit board minimized wiring and made the device more reliable. Switches were added to select from many pre-programmed sequences.
It is no longer completely waterproof (because air holes are required for the compressor), but can take heavy water spray from just about any direction.
US Sailing article about our idea. Click to open in a new tab.
This version was born to solve an issue the R/C was concerned about – accurate raising and lowering of the flags. Our Race Officer had the idea to use bright LED lights to replace the flags, and the new version was born. It is currently in development, but is expected to be released in the Spring of 2020. We are grateful to be working with an international group of engineers with a passion for sailing to make this endeavor possible!
There has been some discussion online about this project. We hope to make a proposal to US Sailing and World Sailing to include provisions for a Lighted Start Sequence addendum to the Rule 26 sequence.
https://www.ussailing.org/news/raceofficials-story-racestartlights/
More information will be added below as the project moves along.